Necessary software:
- SB3UGUI (Latest)
- Blender for 3D editing (I don’t know about others, you’re on your own if you want to use any others), 2.8 is untested but it should work (not so sure about the scripts in this post though).
- Any good image editing software. Photoshop works, and I guess GIMP too.
- If you’re using Photoshop, you’ll need to get the DDS plugin for it. https://developer.nvidia.com/nvidia-texture-tools-adobe-photoshop
Before we begin, I want you to know that this tutorial won’t do you any good if you don’t know the basics of Blender, and that includes handling skeletons.
Also, note that you need some experience modding. This guide won’t cover any of the basics, so don’t expect to see extensive solutions to simple things like an exception because you forgot to parent your head to the skeleton, or morphs not exporting because you left a modifier other than armature on the head mesh (if you don’t know what any of that means, stop trying to do this and go back for simpler things, I recommend starting with basic accessories, then going with skinned accessories, then clothes, and finally heads, this is not something you should be trying with no experience). If you want more in depth information on how to use SB3UG, see Starlene’s tutorial to import clothes.
I won’t cover these here, there’s many tutorials for that on the internet. Either ask, or search for an answer in Google.
Also, have in mind that most of this is more like a general guideline, what you end up importing and how it looks is entirely up to you, your tastes and your ability to make it look alright. Your (and others) mileage may vary.
Well then. Read more after the split.
[Preparing the files (you can use any of my head mods as a template and save yourself all this trouble, just change the file names, CAB Strings, IDs, names, paths and assets for yours)]
First thing, copy cf_head_00 to a new file. Name it however you want. You can even put it in its own folder. Up to you.
In my case, I’ll name it christie_head.unity3d, and I’m going to put it in its own folder, called roy12_christie.

Now open your new file in SB3UGUI. The first thing we’ll do is change its CAB STRING to avoid conflicts.
I did it with my string generator.

Save the file.
Don’t close SB3UGUI yet.
Go to abdata/list/characustom, and make a copy of 00.unity3d.
The copy can be named anything, but it must have a number of two digits in the end, such as 00, 01, etc.
Mine is named roy12_christie_00.unity3d

- Now, open this file in SB3UGUI.
- Now, delete all but cf_f_head_00.
- Double click on cf_f_head_00.
- A list will open.

Select the 3 first lines, and delete them.
Change the first field in the line left to a high number, but don’t go over 200999 which I think is the highest, anything higher and you’ll be Keep the category and use MoreSlotID numbers, and make MoreSlotID a requirement to avoid conflicts. You’ll thank me later.
changing the category, we want a head, so it must be 200xxx. Make sure it doesn’t conflict with other heads. We don’t have many so that’s easy.
Since I’ve already used 200004 for Tina, I’ll use 200005 for Christie.
In the third field, give it a description. I’ll call it Christie.
In the fifth field, you must reference the file we created a few steps before. In my case, christie_head.unity3d at abdatachararoy12_christie,
so I put chararoy12_christiechristie_head.unity3d in this field. Notice how it doesn’t need you to add the abdata directory!You don’t need to add the abdata directory, the retail game already points to it in a field previous to this one (only added in the retail game).
Leave the 7th field as p_cf_head_02.
Now click on apply and save the file.

Notice how it now has a new field with abdata as its value? Well, the retail game needs this field. You get it from the original 00.unity3d from the game, so don’t worry too much about it. Just make sure you’re editing the right fields from here on (just imagine it in the following pictures).
To make sure it saved correctly, reopen the file and check the list.
Now, we confirm that everything up until now is working.
So open the game, go to face type, and in the first tab, select your “new” face.

Since we’re using the second head as a source, we might want to check A – Type 1, then change to the new one to confirm it’s working.
With this, we’re done with preparing the files, for now anyways.
[Getting the original head for reference]
Since we need to adapt another head to the game, the best way is to use the original HS head as a reference.
So, we’re going to extract the HS head to an FBX file with SB3UGUI.
Open your new chara file which contains the head, in my case christie_head.unity3d
We’re using the first head (p_cf_head_02).
Double click on it, select p_cf_head_02 in the new tab, and click on Virt. Avatar.
I always set the virtual avatar manually, still not sure if it’s necessary, but I’ve had no issues with it so far (please tell me if it’ll come back to bite me in the dick later).
Now, expand the tree up to cf_O_head, and select the SkinnedMeshRenderer.
In export options, click on Export as is.

The log might print some warnings. Ignore them.
You should get a new folder where your unity3d file is located, named just like your unity3d file
Explore it, and you’ll see your exported mesh as a FBX file.

You’ll ned to import this file in Blender.
[Blender]
To import the FBX into blender, use these settings (still valid as of 2.8)


Now the HS head has been imported into Blender

Now, you import your character, and get its head and preferably hair, since moving the hair around right now will save you having to do a lot of adjustment later. This, again, depends on the source, and I’m not going to give you any specific instructions regarding this, that’s too broad.
Also, make yourself a favor and import the head parts of your character in a different layer (anywhere the HS head isn’t at), and leave the hair in its own layer too. Wee need some order. If you’re in 2.8, that’d be collections.
Now, I import my models, head first, then hair.

Now, as you can probably see, I’m lucky enough that I got not only the meshes, but the skeletons too, which means that I can use the head skeleton to make expressions later. Pretty handy. Now, you might not be so lucky with whatever you’re importing, but if you get the skeleton (and it works), then consider yourself lucky. If you don’t, you’ll have to either make a skeleton, rig the model to the skeleton and use that, or wait until you’re done and make the expressions by editing every morph in edit mode.
If you have the skeleton:
Use it to scale everything uniformly whenever you need to, you might have eyelashes, brows, teeth, etc, you’d want to scale them along with the head, and since you have a skeleton and will need it later, you can just scale the skeleton, everything else will scale along.
If your skeleton works in Pose Mode but moving it in Object Mode doesn’t move the other objects along with itself, then you’ll have to parent the objects to the skeleton (CTRL+P, Armature Deform).
If you don’t have a skeleton:
While being in object mode:
Set your cursor to 0,0,0:


Now create an empty object in Blender, and parent all the head objects to it, so that at least you’ll be scaling everything uniformly.
You create it like this:

It should be created at the same position as the cursor (0,0,0).
Then, select all the head objects, then select the empty axes last (it should be the only bright one out of all the selected objects).
Now press CTRL+P. Click on object.

Now, whenever you scale/move/rotate the empty axes, the head along with eyes and everything else will scale/move/rotate.
We’ve got our stuff ready to move it, we want to move it to the right position and scale accordingly in relation to HS.
Now here, I can’t exactly tell you a step by step of what you need to do, since again, every asset from every game tends to be different.
The only recommendations I can give you are:
- Always scale using either the skeleton or the empty object, and always do so in Object Mode.
- Also, if your head parts and hair have different skeletons, scale/move them together to make sure they end up with the same scaling/position.
- Mind the proportions. I try to take the eye and mouth positions in mind, and the size too.
- Try to always scale uniformly (meaning, no individual X/Y/Z scaling), otherwise your character might look weird.
- If your head comes a bit bigger on the back than the HS head, don’t worry, you can fix that with edit mode. Just try not to screw up the rest of the head.
Once you’re done moving and scaling both the head parts and hair, you have to apply scale and rotation, so while having the head parts, the hair and the skeleton (or empty object) selected, press CTRL+A->Rotation & Scale. No need to apply position, not yet anyways.
After having applied these, if you have skeletons, make sure they still work in pose mode. They should.
Now you need to edit the head’s neck:
- Cut whatever you don’t need.
- Try to use dissolve vertices/edges and the knife tool.
- This is up to you, but try to not screw the UV map.
Now that you have a clean neck edge, you need to put the vertices of the new head at the same positions as the HS head’s neck edge vertices. This is to ensure that you get a 1/1 match with the body’s neck edge. The method I use is, select the HS head, get in edit mode, select a vertex at the edge of the neck, and snap the cursor there (SHIFT+S, Cursor to Selected). Then I exit edit mode, select the new head, enter edit mode, select the closest vertex to the cursor’s position, and now snap the selection to the cursor (CTRL+S, Selection to Cursor).
Once that’s done, you should have something close to this:

(mine has textures and all that jazz assigned to it, not really necessary)
Notice how the edges of the neck are the same as the original HS head edges.
Now’s a good time to modify the UV of the head if it’s a mirrored kind of UV (most games have this style of UV). If you don’t, you’d still want to modify the UV to have the blushes at the right position. However, you don’t want to modify the original one yet, you’ll need it later.
So you’re going to create a new UV for it.
While in Object Mode, select the head mesh, and add a new UV map (Properties->Object Data->UV Map)

This will create a copy of the selected UV.
You’ll also need to use something as a reference. In this case, we’ll use the blushing texture as a reference to know at least where the blushing should be.
In SB3UGUI, open cf_m_base.unity3d from abdatachara, and extract the texture cf_t_hohoaka.
Set this texture to your new head model (how you do it is up to you, the easiest way is to open the texture while being in edit mode and having the whole
UV selected).
Now, if you want it to show on top of your diffuse, you can use cycles rendering, and use this node set for your material:

You can change the diffuse texture to one of HS’s face textures if you want to use that as a reference too (I do it).
Anyways, remember to only edit the new UV you created, don’t touch the original UV.
Once you’re done, you should have something like this:

We need to bake the original textures from the original UV to the new UV.
To do this, we use cycles rendering and nodes.
If you used nodes to have the blush texture on top of the diffuse, you can modify that one.
So, set your nodes like this:

Make sure you select the 2nd texture slot like in the screenshot (bake target) before baking, this is to tell blender that’s the one you’re baking onto.
Do this for as many texture types your face uses (diffuse, normal, specular, occlusion map, etc). You probably have at least the first 3, unless you’re
importing from a really old game (which I don’t recommend).
My result:
 |
 |
|
Original UV |
New UV |
NOTE: If your texture looks too dark after baking, try removing the source’s alpha channel with Photoshop or something, then save to TGA. Blender seems to have a problem with baking textures like this
if they have an alpha channel. You can set alpha to none too in the texture’s settings.
Now, you might or might not want to do something similar with the eyebrows. In HS, we need to be able to color eyebrows. Most games won’t give us separate eyebrows meshes. What I do in this case is make a duplicate of the head, remove every vertex besides the eyebrows zone, and do something similar to the previous process, only this time I manually recreate the brows with Photoshop (else they’ll look really low res up close, they are). This is up to you, you can create a little hair strand brush and brush on top of the generated brow. Others prefer to leave it as is and just use levels to get the hair from the diffuse, that’s okay but it might look very blurry.
Also, for eyelashes, if they’re separated in top/bottom or right/left, you need to join them. If the different pieces use different UVs and different textures, you can join them manually and fix the UV accordingly. That’s what I do. I have no guidelines for this, so you’re on your own at this step, sorry.
From here on, you can edit the textures to look like the HS ones (brightness, levels, etc), or you can continue. It doesn’t matter because as long as you keep your current progress saved somewhere else (even a different layer in the scene is fine), you can bake again from the original texture.
Now that we’re done with all this, we want to see if everything works ingame. So the first thing we’ll do is change all the headparts “point of origin”.
When you select an Object in Blender, if you’re in Object Mode, you’ll notice a white circle somewhere in the 3D space. This is that object’s point of origin.
Then there’s the cursor, which is the white-and-red circle, you can position it with SHIFT+S or the left mouse button.
What we need to do, is to change all the head parts point of origin to be the same as the HS’s head. That might include the hair (importing the hair isn’t very fun so I’m leaving that for last).
So first, go to wherever you’ve put your HS head (hopefully a layer different from where you’re working in), select the HS head in Object mode, then
SHIFT+S->Cursor to selected.

Go back to where you’ve been working on your character’s head.
Select all the head parts it needs.
While in Object mode, go to Object->Transform->Origin to 3D cursor.
You’ll notice all your head objects will have their origin set to the same as the HS head.
From this point, you need to make a copy of all the objects, because we’re about to do actions that cannot be undone, but we’ll still need this old stuff, so copy all the objects to a new layer, and switch to that layer.
- Select every object in the new layer, and remove every vertex group you might have.
- Also, for the head, remove the old UV, since you want the new one in the game. Delete the skeleton and/or empty axes.
- If your objects move from the ground after doing that, just put them back at 0,0,0 with the usual methods.
- Have in mind that you might want to use HS’s eyeballs, since that way you don’t have to remake the UV for the eyeballs too. So we’re going to ignore the character’s eyeballs, and fix the HS eyeballs later to fit the new head.
- Select all the objects and rotate them in x-90, and then apply scaling and rotation (CTRL+A->Rotation and Scale).
- Take the HS head skeleton from wherever you’ve had it all this time, duplicate it and move the duplicate to this head layer.
- In the head layer, for every head object, create a new Vertex Group called “cf_J_FaceRoot”, and assign all vertices to it.
- Select every object, and then select the HS head armature (I just select all with A, then select the armature again by right clicking on it twice), and parent the objects to the armature (Ctrl+P->Armature Deform).
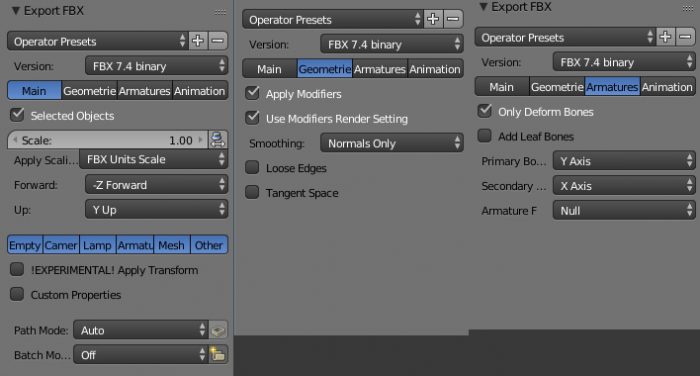
Finally, select everything again, and export to FBX using these settings:
- Open your new unity3d file in SB3UGUI, and open the p_cf_head_02 animator.
- Open the FBX you exported from Blender.
- If it throws an error about faces needing to be triangulated, go back to Blender and triangulate any meshes that have square faces. (No longer necessary, but I still recommend pre-triangulating before exporting).
- Begin replacing the meshes, one by one.
- Replace the head for the new head, the mouth for the new mouth, the tongue for the new tongue, the brows for the new brows, and the eyelashes for the new eyelashes.
- Since you’re exporting normals but not tangents, you should get a message in the log telling you that tangents were automatically recalculated. Do NOT recalculate normals, as your head might have custom vertex normals and you will screw them up if you recalculate, and it will end up looking somewhat different than intended.
Check that everything is in place, and then save. Now go see if our (current) monstrosity works. Go in game, go to the character creator, and select your new face type.
Yes, right now it probably looks horrifying, but hey, it’s working.
With this, we can confirm that we’re on track.
Let’s fix the eyes now. Remember I said using the HS eyes is ideal? Well, we’re going to export the eye meshes from HS. Not really useful, if you need to edit them, edit them inside of SB3UG by moving the bone matrices of each skinnedmeshrenderer until it works.
Now here’s a problem. I’ve not been able to find a perfect way to get the eyes working in a neutral position from the beginning, so the best you can do from here is use the sliders to position them correctly. I can tell you that these sliders can now control the depth and position of the eyes, besides the sliders at the eyes section.

If even with this they’re still missaligned, you need to go back in blender, scale down a bit each eye, apply scaling and position, re-export from Blender, re-import with SB3UGUI, then test. It’s pretty much a trial and error nightmare, but I’ve not found a better way to do it. make yourself a favor and use WideSlider.
[MATERIALS AND TEXTURES]
You should already have the textures you baked with Blender (diffuse, specular, normal).
Go to the chara directory of the game, and copy cf_m_face_00.unity3d. Rename it to whatever you want. Open it in SB3UGUI and change its CAB.
If you made a directory for your mod, put it there.
Go to abdata/list/characustom, then open up your list file. In the first line of the list, in the 14th field, you must set the path to the new material asset. Remember to apply and save, it’s a common mistake to just save the asset bundle, it happens to me. The list is automatically commited nowadays, so just save when done.
Once done, go in game, see if your face still works. If it doesn’t, check the log of the game, maybe it didn’t load the material file and you have to change the inventory offset. Should no longer be a thing, inventory offset is no longer something we should worry about in HS.
Also, if as of writing this guide, SB3UGUI still can’t link to external materials, you’ll need to also take materials from the “master” material asset bundle. You can mark them to be copied from mat_cha_00.unity3d and paste them in your head meshes asset bundle. The materials are: Use any of my head mods as a template and save yourself this trouble. Just replace the assets inside of them and be happy. List of materials:
- Eyes shadow: cf_M_eyekage_01
- Eye Highlights: cf_M_eyelight
- Eye balls: cf_M_eyewhite_01
- Head (might not be necessary): cf_M_head_00
- Eyelashes: cf_M_matuge
- Eyebrows: cf_M_mayuge
- Tears: cf_M_namida
- Tongue: cf_M_tang
- Teeth: cf_M_tooth
After copying them in your corresponding head meshes asset bundle (mine is christie_head.unity3d, so that you have a reference), go in the animator and assign each material to their respective mesh (eyelashes uses cf_M_matuge, etc).
When you’ve confirmed that it works, close the game, and in the new material file, replace the specular texture in the file with your specular texture. Oc texture by your occlusion map. If your source has none, bake it yourself with your 3d software. You most likely will need to also edit the specular texture your source has, as this game requires a PBR-ish specular (though they didn’t really respect PBR so just take the original head’s as an example of what you’ll need).
In chara, copy cf_t_face_00.unity3d, again, put it wherever your mod files are. Rename. Open in SB3UGUI, change CAB, save.
Go to the list directory, open 00.unity3d and your list. In 00.unity3d, select cf_t_face_00, and mark for copying. Then in your unity3d, paste all marked. Now close 00.unity3d.
Open your new list. In the first field goes the ID, I suggest starting from 250050 using MoreSlotID, otherwise you’ll end up conflicting with all the other tons of mods the game has. Second is the order, whatever you want. Third is the name (make sure it’s not the same as any other head, as the game actually seems to have issues with repeated names). Fourth is the path to the file with the textures. Set it to the file you created a while ago. The other fields pretty much point to the texture to use. Take note of these since you’ll be replacing them in the textures file.
Apply the changes, then save.
Go ingame to see if both the new file and list work.

Now let’s replace that skin in our texture file. Close the game, open said texture file. Remember I told you to take note of the used textures? Replace each with diffuse and normal respectively.
Save the file.
Now let’s see if they work in game.

There we go. But it looks orange. This is because the game requires really pale diffuses and specific levels for speculars and object speculars. Here’s one part I can’t really help you with. You’ll have to modify your diffuse until it looks fine to you, same goes for the specular. Good luck. Use the original textures of the game to have an idea of what the new ones should look like.
You can edit these now, or you can wait and do it later. We’ve still got lots of work to do.
We’re done with the face for now.
NOTE: This small section only applies if you removed the brows from the textures and put them in their own mesh.
[BROWS TEXTURES]
- Go to the chara directory, copy cf_m_eyebrow_00.unity3d, you should know what to do with this by now.
- Replace the first eyebrow texture (cf_m_eyebrow_00_00_00) with your new texture. Save the file.
- Go to the list directory, open 00.unity3d and your list file. Copy cf_m_eyebrow_00 from 00.unity3d to your list file.
- Remove all lines except the first one.
- Change the first field, begin maybe from 251050.
- 4th slot’s the name.
- 5th is the path to the material and texture file, set it.
- 6th is the material name, change it if you used another one.
- Go see if it works ingame.

Here ends the brows section. Some prefer adding the brows as a face tattoo, so there’s that option if you prefer it.
[Eyelashes textures]
- Go to the chara directory, copy cf_m_eyelashes_00.unity3d, rename and change its cab.
- Open the new file.
- Replace the first eyelash with your new eyelash.
- Save the file.
- Go to the list directory.
- Open 00.unity3d and your list file.
- Copy f_m_eyelashes_00 from 00.unity3d to your list file.
- Close 00.unity3d.
- Open the new list in your list asset.
- 1st field is the ID,
start by 252050 maybeseriously use MoreSlotID. - 4th is the name.
- 5th is the path, set it.
- 6th is the material, change if necessary.
- Apply the changes
- Save the list
- Go see if it works in game.

[MORPHS]
If you have a skeleton, this part is easier, because you can do every head part expressions at the same time, and if you ever need to change something in the mesh that messes around with the vertex order or count, you can do it and then remake the expressions real quick.
If you don’t have a skeleton, then you might be able to merge every mesh, make the shape keys, separate, and then export the main head parts from the base shape.
- Take your head parts and the skeleton to a brand new scene (or new layer, whatever you think is tiddier). Just select them all, CTRL+C, create a new scene (use copy settings), then CTRL+V in any layer.
- Here, provided you have a skeleton, you need to know about how to make poses in pose mode, and make keyframes out of this.
- Also if you have no rig or a very terrible rig, I recommend just making one from scratch using Rigify. It takes time but it’s better than doing morphs in edit mode imo.
Here’s a quick rundown on pose mode and pose library.
- To enter pose mode, you select the skeleton, and then change to Pose Mode.

- When you’re in pose mode, you can translate/rotate/scale the bones and save that state to a pose library.
- To manipulate the bones, use what you usually use to manipulate anything else.
- To create a pose library, go to object data while in pose mode, then in Pose Library, click New.

- You can name the PoseLib to whatever you want. I named it DoA_GenericPoseLib.

- So, great, now we have a pose lib. To create a new entry, while in Pose Mode, select all the bones you need in the pose,
then use Shift+L->Add Pose. This adds a new Pose to the Pose Lib. - To apply a pose, you again select all the bones in Pose Mode, and then click on this button.

- To modify a pose, while in pose mode, select all the bones, Shift+L->Replace existing->Select pose to replace.
Important Notes Before you start making expressions:
- Go into SB3UGUI, and check the head parts morph orders. Namely, the head’s.
- You need to make the poses for the face in this same order! Sadly, we still can’t reorder the Poses saved in the Pose Lib.
- So you should start with e00_def_cl, and finish with k56_name_b.
- Please, name the poses the same as the morphs you find in SB3UGUI, this is to ease the morph renaming later.
- The poses called “head shape something” are not necessary unless you want to modify your head’s shape in some particular way.
- Other head parts have different names, but they all begin with the same prefix before the _, so don’t worry about it right now.
- Also other head parts might not need all the morphs the head needs, but removing morphs from an Object is easy and can be done later, so don’t worry about it while making poses.
Familiarize yourself with this and with the pose library, it’s really useful and I actually use it later to name my morphs.
What I like the most of using a pose library though, is that if I’m importing more than one character from a set game, and they both use same-ish skeletons (same bone names, mostly same positions), I can use any previously done pose libraries on the new character, and just tweak the poses where necessary. This really saves me time.
If you don’t have a skeleton though:
Merge every head part.Use shapekeys to make morphs in edit mode.When you’re done, separate each head part.If you’re in 2.77, install the “Corrective Shape Key” add-on.Select a head part.Select its base shape.In the shape key pannel, click on the black down arrow.Click on “Create Duplicate for editing”.A new object (a duplicate of that shape with no other shape keys) will be created.Weight this new object to the usual bone.Export to fbx and replace the main head.- Make a rig, do the expressions with that, be happy.
So, let’s say you’re done with your poses, they’re correctly named and in the right order.

We’re now going to create keyframes out of our poses, 1 per pose to be exact.
Advance a frame in the timeline (use the left/right arrows to move from frame to frame). You can see the frame counter in the 3D window:

Next, we use scripting. Set any of your windows in Blender to the Text Editor, and create a new text, name it macro_keyframes:

Now, paste this code:
import bpy

from mathutils import Vector, Matrix, Quaternion, Euler, Color


context = bpy.context


cont = bpy.context.area.type

print(str(cont))


cur_scene = bpy.data.scenes["Change this to your Scene name"]


bpy.ops.poselib.apply_pose(pose_index=cur_scene.frame_current-1)


bpy.ops.anim.keyframe_insert_menu(type='WholeCharacter')


cur_scene.frame_current += 1
Change the scene's name in the code to the name of your scene. Mine is Morphs, so I put "Morphs" there, with the quotes.
While having your skeleton in pose mode, select all the bones, and then in the text window, press Alt+P.
If you did everything right, you should see the skeleton applying poses automatically, and it will create keyframes out of them automatically, while
also advancing the frame counter automatically.
You can see the keyframes if you set any Blender window to Timeline. They get marked with a yellow line.
Now, press Alt+P as many times as you need (once per pose) until you get the frame counter up to the amount of poses you have.
Should be 115. Leaving Alt+P pressed also works, just be careful not to get past 115 frames.
If you’re smart, you’ll do this once with a single skeleton and reuse that for the names on later projects, only having to press I to make a new keyframe per expression.
Now, you should have 115 frames in the frame counter, while your Pose Lib has k56_name_b selected.

Now that we have our keyframes, we need to export them to Lightwave Point Cache (.mdd). This format is pretty much the keyframes converted to shapekeys.
So, go back to the very first frame (0), select the head only , and export to .mdd.


Do this for every head part. And yes, use 115 for the End Frame in every export.
Duplicate every head part, and move the new dups to a new layer. We no longer need the skeleton, so if you duplicated it too, delete that duplicate. Don’t delete the original though, if you want to tweak expressions later, it’s a good idea to keep your rigged face, and we’ll need it to rename the expressions anyways.
If your objects get moved to Z+ when deleting the duplicated skeleton, just select them and press Alt+G. Don’t know why it happens, but this fixes it.
If you’ve done everything right, your objects should all be aligned. Also, press Alt+A to apply scale and rotation. Else your morphs will also rotate the head in 90x.

Select the head, then import the head .mdd. Leave the settings at default.

Now see if your morphs work by going to Object Data (triangle and points icon) and from there to Shape Keys. Pin the first morph.
Should be the blinking morph.
Now do this for every other head part. You might notice that the first two shape keys are the same (not counting Base, leave that alone!)
Delete frame_0000 in every head part.
Let’s rename the morphs now. First rename your parts Object names to represent what they are (head as head, brows as brows, etc). The new script looks for them and names the morphs accordingly.
Take this script, and make a new text to run it:
import bpy
import os
from mathutils import Vector, Matrix, Quaternion, Euler, Color
context = bpy.context
os.system("cls")
poseList = ['Basis']
rig = bpy.data.objects.get("Name of the skeleton with the poseLib containing the morph names")
pl = rig.pose_library
i = 1
if pl != None:
    for item in pl.pose_markers:
        poseList.append(item.name)
        print("Pose " + poseList[i] + " appended to list successfully")
        i+=1
i = 0
suffix = ""
prefix = ""
for dest in bpy.context.selected_objects:
    if "head" in dest.name:
        prefix = "bs00_eye."
        suffix = ""
    elif "brows" in dest.name:
        prefix = "bs02_mayuge."
        suffix = "_mu"
    elif "lashes" in dest.name:
        prefix = "bs01_matuge."
        suffix = "_m"
    elif "tongue" in dest.name:
        prefix = "bs07_sita."
        suffix = "_sita"
    elif "teeth" in dest.name:
        prefix = "bs06_ha."
        suffix = "_ha"
    elif "t1" in dest.name:
        prefix = "bs03_namida01."
        suffix = "_n01"
    elif "t2" in dest.name:
        prefix = "bs04_namida02."
        suffix = "_n02"
    sks = dest.data.shape_keys
    skNames = sks.key_blocks
    for sk in skNames:
        if sk.name != "Basis":
            sk.name = prefix + poseList[i] + suffix + "_0"
        i +=1
    i = 0
Go to the layer where you still have your skeleton, copy its name. Paste it where I tell you to paste it in the script.

Go back to the layer with your shape keys, and get the name of the head part you’re renaming shape keys for. Not necessary if you did what I told you and renamed the objects to represent what they are.

Now, select all the head parts with morphs, then press Alt+P in the text window while being in Object Mode. If you did everything right, you should get no error, and your shape keys should be automatically renamed in order.
Do the same for the other head parts, and have in mind what I commented there, the other head parts have a suffix depending on the head part. Again, no longer necessary.
If the Basis gets renamed, just rename it back to Basis (should not happen with the new script).

Now, since only the head must have 114 morphs, here’s a script to remove superfluous morphs from the rest (you need to run it once per head part, and like the previous one, it looks for the name of the object, so be careful):
import bpy
import os
import re
from mathutils import Vector, Matrix, Quaternion, Euler, Color

context = bpy.context

def deleteShapekeyByName(oObject, sShapekeyName):

    # setting the active shapekey
    iIndex = oObject.data.shape_keys.key_blocks.keys().index(sShapekeyName)
    oObject.active_shape_key_index = iIndex

    # delete it
    bpy.ops.object.shape_key_remove()


os.system("cls")

dest = bpy.context.scene.objects.active
sks = dest.data.shape_keys
skNames = sks.key_blocks

ishead = 0
ismouthpart = 0
iseyepart = 0


dest = bpy.context.active_object
if "head" in dest.name:
    ishead = 1
elif "brows" in dest.name:
    ismouthpart = 0
    iseyepart = 1
elif "lashes" in dest.name:
    ismouthpart = 0
    iseyepart = 1
elif "tongue" in dest.name:
    ismouthpart = 1
    iseyepart = 0
elif "teeth" in dest.name:
    ismouthpart = 1
    iseyepart = 0
elif "t1" in dest.name:
    ismouthpart = 0
    iseyepart = 1
elif "t2" in dest.name:
    ismouthpart = 0
    iseyepart = 1

if ismouthpart == 1:
    for sk in skNames:
        found = re.search(r'e[0-99]', sk.name)
        if found:
            print(sk.name)
            oActiveObject = bpy.context.active_object
            deleteShapekeyByName(oActiveObject, sk.name)
elif iseyepart == 1:
    for sk in skNames:
        found = re.search(r'k[0-99]', sk.name)
        if found:
            print(sk.name)
            oActiveObject = bpy.context.active_object
            deleteShapekeyByName(oActiveObject, sk.name)
elif ishead == 1:
    print("done")
Once you’re done with every head part, in Object mode, rotate every head parts back -90 in the x axis, then apply scale and rotation, and then rotate everything in +90 in the x axis (don’t apply). Then, export every head part to FBX, with the usual settings.
Now, go to SB3UGUI, open your character’s .unity3d, open the head parts FBXs in SB3UGUI.
- For the head, you should end up with 114 morphs (both prefixes, e and k).
- For the mouth, 56 (prefix k).
- For the lashes, 58 (prefix e).
- For the brows, 58 (prefix e).
- For the tongue, 56 (prefix k).
You might get less because some morphs don’t do anything to any vertex. I think this is a bug in the FBX exporter.
To fix it, I simply take note of which is missing (this can be annoying, yes), then go to blender, select that shape key, enter edit mode, and move a single vertex by 0.001 or something in any direction. A vertex that isn’t in plain sight is better. Then re-export.
You can also use this script to write what shape keys are not changing from the base and move a vertex in them:
import bpy
import bmesh
import os
os.system("cls")
tolerance = 1e-5
obj = bpy.context.active_object
shape_keys = obj.data.shape_keys.key_blocks
for shape in shape_keys:
import bpy
import bmesh
import os

os.system("cls")
tolerance = 1e-5
obj = bpy.context.active_object
shape_keys = obj.data.shape_keys.key_blocks

for shape in shape_keys:

    sk1_name = shape.name
    sk1_data = shape.data
    skb_data = shape_keys['Basis'].data

    bpy.ops.object.mode_set(mode="EDIT")
    bpy.ops.mesh.select_all(action="DESELECT")
    bpy.ops.mesh.select_mode(type="VERT")
    bpy.ops.object.mode_set(mode="OBJECT")

    for i, (x, y) in enumerate(zip(sk1_data, skb_data)):
        if (x.co - y.co).length > tolerance:
            obj.data.vertices[i].select = True

    bpy.ops.object.mode_set(mode="EDIT")
    b=bmesh.from_edit_mesh(bpy.context.object.data)

    if len([v for v in b.verts if v.select]) <= 0:
        print(sk1_name)

    bpy.ops.object.mode_set(mode="OBJECT")
Anyways, to import the morphs, select the keyframes (the root of the tree), then drag and drop it to the morphs tab of the animator.
Here's the lashes for example (because I already tested the head, sorry):

Make sure you're selecting the head part whose the morphs you're importing correspond to. The names aren't really important.
Once you're done, and you've verified that you have the same amount of morphs and morph groups than the original cf_head_00, save.
Finally, test in game:

Good, we have our morphs working as intended.
[Hair]
Go to Hair Importing Guidelines Post…
That would be all.
Comments are closed.