Contents
Requirements
Disclaimer
Not beginner friendly guide, because the guide is long enough already.
This guide assumes you have already done your skindentation in Blender. If you don’t use Blender, then you can export to FBX and import that in Blender. If you have no idea of how to use Blender or any other 3d modeling application to do any of this, this guide will not cover that. This guide also assumes you have basic knowledge of how to do certain things in Blender, such as adding modifiers to meshes, parenting them to armatures, using pose mode to check mesh skeletal deformations, etc.
This guide also assumes you know how to put your meshes into the game as a zipmod. Otherwise, here’s a guide.
For now the guide only covers how to do it with SB3UGUI, I will cover Unity later.
Rules
- The mesh must follow the body topology to a certain extent. This is a layered mesh, so if something is too close to the underlaying body, it must have the same topology, down to triangle and vertex positions, to better avoid clipping. You’re free not to follow this rule, but you will run into issues.
- The mesh UV must be the same as the body’s. I recommend carefully adding the loops and bevels you need, where needed, without doing fancy things such as subdivision, since fancy things are bound to mess up the UVs. If you carefully detriangulate and only add loops and do bevels where needed, your 3d modeling program (in my case Blender) will most likely handle the UV without having to manually modify it.
- The mesh should preferably have no material assigned to it. Don’t make your mesh depend on additional textures, as this method copies the body material, including textures. Any additional textures or materials assigned to the mesh will be replaced in runtime.
Getting your mesh ready
I have a mesh right here I’m kinda happy with:
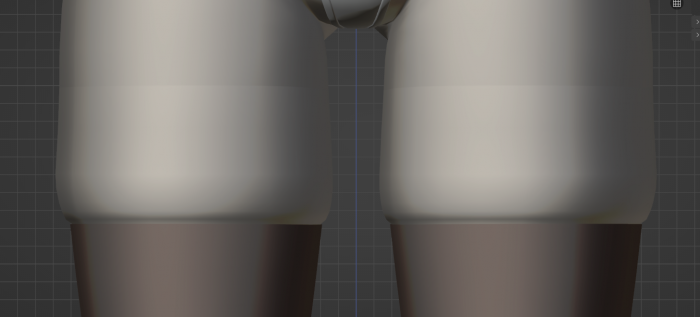
Notice the normal difference at the top. To fix this, if you don’t know how, you assign a vertex group to the vertices at the edge:
Now you add a DataTransfer modifier like this:
Apply the Data Transfer modifier. Now let’s make sure your mesh is correctly rigged to the skeleton you’re exporting it with, I’m using the same skeleton for the body in this case, so it’s going to move along with it:
If for some reason your mesh is not moving after parenting, you might be missing the vertex groups, so you’ll have to copy the weights from the body.
Finally, do the rotation trick required in Blender to create an FBX that will work in Unity:
Now your mesh is ready to export.
Exporting the mesh
Here’s my FBX settings to export meshes to Unity:
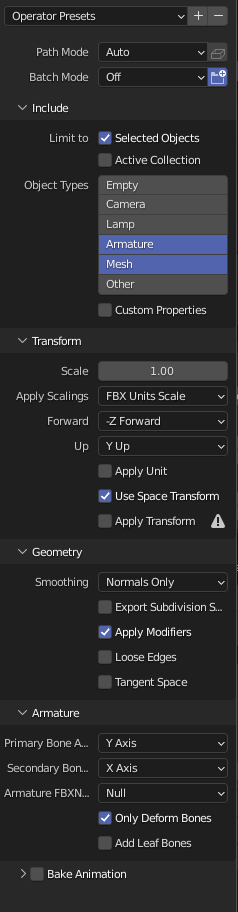
Remember to select only your mesh and the armature it’s parented to before exporting. Exporter anywhere you can find it.
Importing using SB3UtilityGUI
I was going to make a guide using Unity, but Unity has issues exporting material-less meshes and keeping the mesh normals intact, so for now let’s use SB3UGUI.
First, make sure this setting in SB3UGUI is off:
Now, my advise is, use one of my existing asset bundles to import the mesh to. It’s much faster than bothering with creating a new, empty one from a texture bundle. Let’s assume for now you’re doing so. I will explain later what the monobehaviours do.
Rename and open the asset bundle, change the CAB string and replace the old mesh with the new one:
Now, see the ChaCopyBodyMaterial MonoBehaviour? If you inspect this, this is what you get:
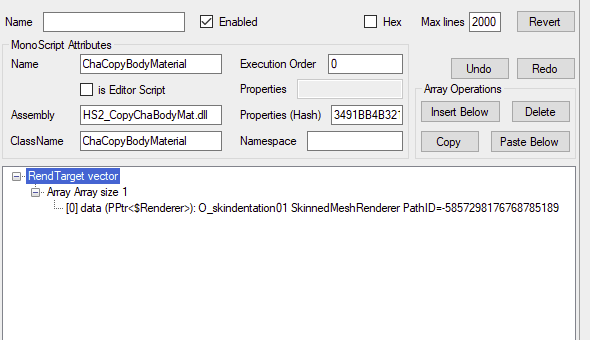
Notice how assembly points to the plugin itself. Don’t change that. The RendTarget array points to the mesh(es) you are copying the body material to. In theory this means anything not there can use any other material, but I’m not sure as I’ve not tested that. As for the Hooah Monobehaviour, it’s so this works as an accessory.
Now save your asset bundle, zipmod it and check it out ingame.
Now go on and make more of these. I know I will.
Possible problems you could find
If when importing the mesh SB3UG tells you an object has non Identity transforms, go back to Blender, unparent the mesh while keeping transforms, and the mesh will probably not say 90 in Rotation X. If it says something like 180, apply all transforms for the skeleton and mesh again, and then do the rotation trick again (-90 in global X, apply, 90 in global X, don’t apply). Importing in SB3UG should no longer log any non Identity transforms.
This can happen when your mesh was parented to the same armature you imported the body with and the mesh already had a 90 rotation before doing the rotation trick.